
ども!ゆうき(@ShakaSeYuki)です!
普段ツイッターなどで仲良くしている、れなれなさん(@takemura_rena)からDMでこんなご相談が。
wordpressの記事内に、
このようなTimelineを作りたいと考えているのですが…
これって、サーバーからそのままファイルに飛んでって、
CSSに追記してしまってよいのでしょうか?
参考記事のURLが送られてきました。

簡単に言うと下のような時系列機能を実装したいそう。
- 7:00起床すさまじい轟音の目覚まし時計を止めて起床
- 8:00通勤乗車率200%の満員電車にゆられながら通勤
- 9:00仕事休憩もほぼ取れない状態の中ウィダーゼリーを補給しつつ仕事に没頭
- 21:00帰宅夜ご飯を調達しつつ帰路につく
- 22:00自由時間ご飯を食べつつ明日の準備をし風呂に入る
- 0:00就寝目覚まし時計をセットし、夢の中へ
ありがとう!
やってみるー!
今回はれなれなさんにDMで誘導して実践してもらいました。
果たしてすんなりいくのか?続きをご覧ください。
JINでTimeline実装までのやりとり
自慢ではないですが…
ヘッダーに文字が現れるという事件がおきたので、早急に消しました(笑)
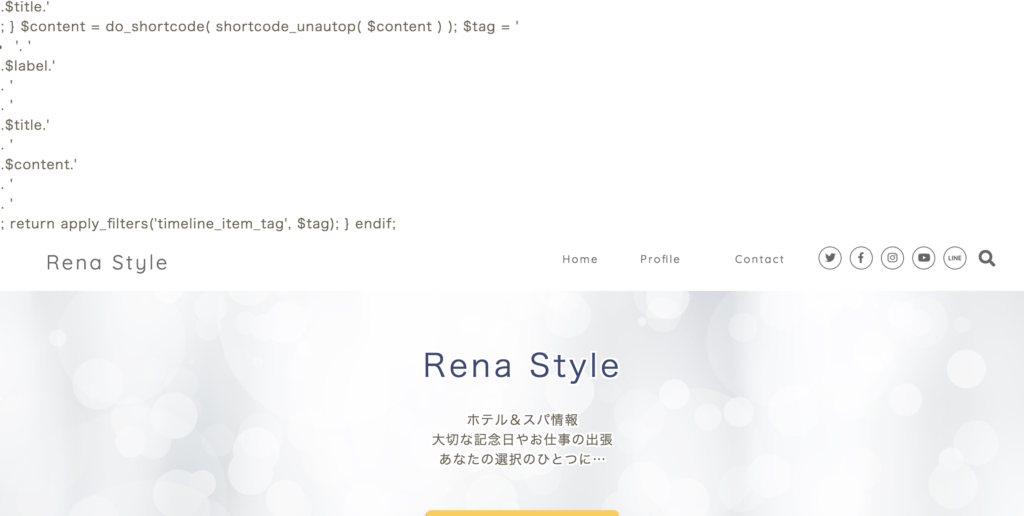
ブログ上部になぜかプログラム部分が出てしまう
んー、phpタグ外に記述されちゃったからかな?
functions.phpにどんな感じに入れたか見たいです!
このCSSの後ろに、そのままコピペで貼り付けちゃった!!
style.cssに入れてしまったのでうまくいかなかった模様
functions.phpのほうに貼り付けてみて!
ここの部屋に貼り付けるのは合ってますでしょうか?
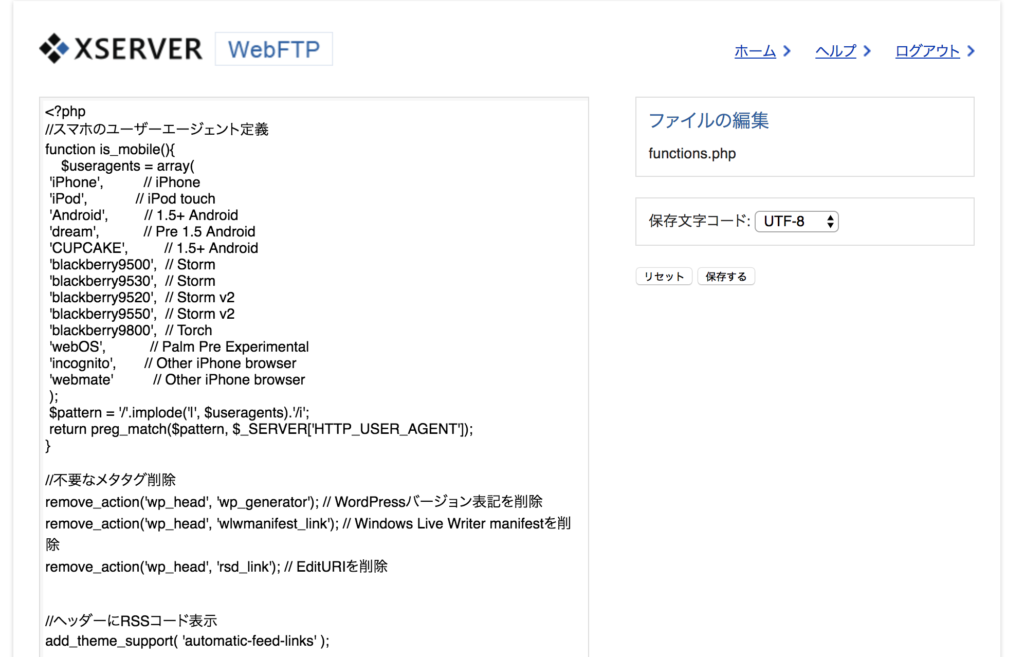
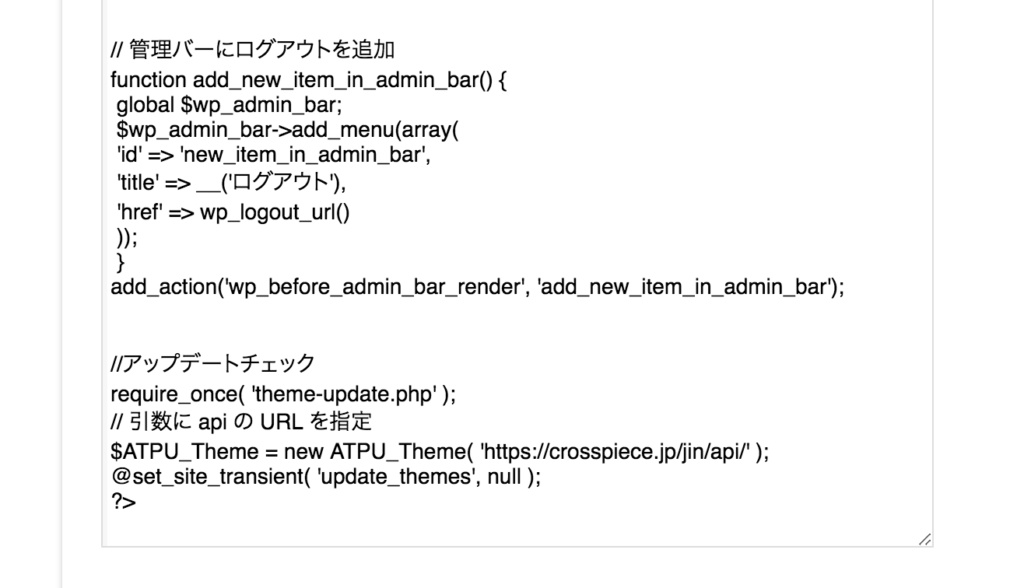
functions.phpにプログラムを追加する
そこで合ってるよ〜!
そこに貼り付けましよう!
これのどの部分でも大丈夫でしょうか?
//必要なメタタグ削除の
手前とかありますでしょうか?
下に追加で大丈夫ですよ〜!
順番は関係ないです!
ありがとうございます!!
そして、今この状態になってしまいました…(笑)
ブログ上部にまたプログラム部分が出てしまう
DMだけでは、改修が難しいと判断したので、
れなれなさんが追加したfunctions.phpをもらうことに!
ん〜、入力したファイル(functions.php)ってもらえます?
こちらに入力いたしました!
本当にごめんなさい(´;ω;`)
もらったファイルを見ていて原因が発覚。
うまくいってなかった原因はphpタグの閉じタグの後に
Timeline用のプログラムを入れてしまったためでした。
該当する部分を修正して、お返ししました。
修正してみたので、これいれてみてください〜!
ありがとうございます!
functionの中にそのまま全編をコピペしても大丈夫でしょうか?
もとから入っているのもあったのなら、上書きで
追加したものだけだったなら下に追加で(。・ω・。)
釈迦さま〜〜〜〜!!!ありがとう♪
サイトに表示するまでできました〜!!!!
あとは、丸の場所がずれてますが…
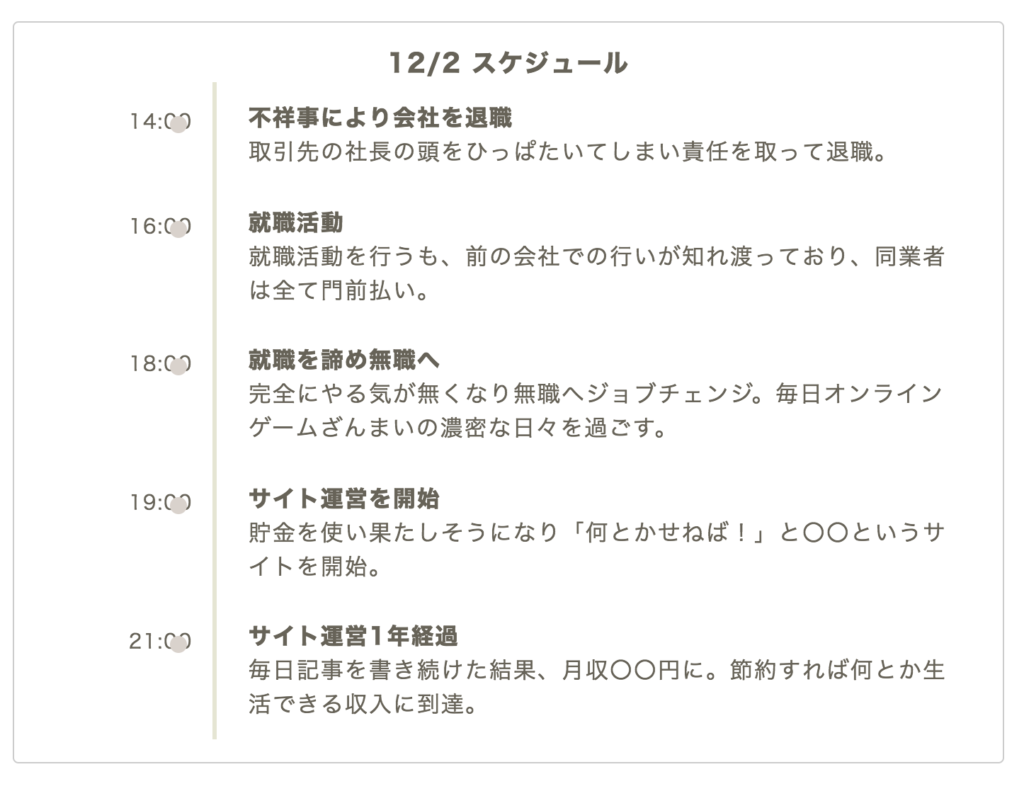
Timelineの表示はできたが丸の部分がずれる
css調整すれば治ると思いまーす!
.timeline-item:before {
content: ”;
width: 12px;
height: 12px;
background: #6fc173;
position: absolute;
left: 105px;
top: 24px;
border-radius: 100%;
}
これのleftの
105pxの数字を弄る感じになります
leftの意味は左から何ピクセル動かすという意味なので
105より大きい数字で調整してみてください〜!
できたーーーー!!!
130pxでいけました〜!!
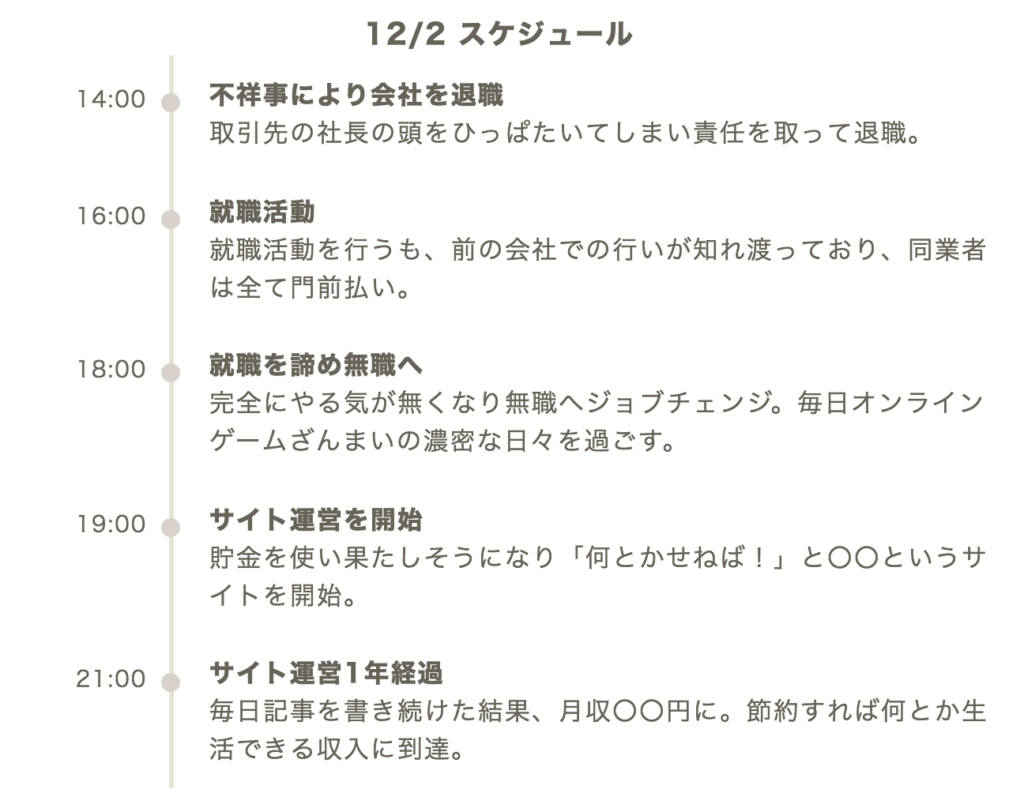
無事にtimelineが表示
お、よかった♪
実際に表示されている記事がこちら

タイに滞在した際の、タイムスケジュール⏰をご紹介するために採用したのが『Time Line機能』でした☺️✨
ずーーっと出来なくて、悩んでいたところを救って頂きました✨
ぜひ、トライしてみてくださいね💓 https://t.co/ZYpRyT6F0O
— れなれな@博多弁女子&オンラインサロン運営中✨ (@takemura_rena) 2018年12月27日
JINでTimelineの実装方法
JINでTimelineを実装するには
JINの子テーマの
- functions.php
- style.css
に以下のものを入れれば完成します。
JINの子テーマのfunctions.phpに追加
//timelineショートコードコンテンツ内に余計な改行や文字列が入らないように除外
if ( !function_exists( 'remove_wrap_shortcode_wpautop' ) ):
function remove_wrap_shortcode_wpautop($shortcode, $content){
  //tiショートコードのみを抽出
  $pattern = '/\['.$shortcode.'.*?\].*?\[\/'.$shortcode.'\]/is';
  if (preg_match_all($pattern, $content, $m)) {
    $all = null;
    foreach ($m[0] as $code) {
      $all .= $code;
    }
    return $all;
  }
}
endif;

//タイムラインの作成(timelineショートコード)
add_shortcode('timeline', 'timeline_shortcode');
if ( !function_exists( 'timeline_shortcode' ) ):
function timeline_shortcode( $atts, $content = null ){
  extract( shortcode_atts( array(
    'title' => null,
  ), $atts ) );
  $content = remove_wrap_shortcode_wpautop('ti', $content);
  $content = do_shortcode( shortcode_unautop( $content ) );
  $title_tag = null;
  if ($title) {
    $title_tag = '<div class="timeline-title">'.$title.'</div>';
  }
  $tag = '<div class="timeline-box">'.
            $title_tag.
            '<ul class="timeline">'.
              $content.
            '</ul>'.
          '</div>';
  return apply_filters('timeline_tag', $tag);
}
endif;

//タイムラインアイテム作成(タイムラインの中の項目)
add_shortcode('ti', 'timeline_item_shortcode');
if ( !function_exists( 'timeline_item_shortcode' ) ):
function timeline_item_shortcode( $atts, $content = null ){
  extract( shortcode_atts( array(
    'title' => null,
    'label' => null,
  ), $atts ) );
  $title_tag = null;
  if ($title) {
    $title_tag = '<div class="timeline-item-title">'.$title.'</div>';
  }

  $content = do_shortcode( shortcode_unautop( $content ) );
  $tag = '<li class="timeline-item">'.
            '<div class="timeline-item-label">'.$label.'</div>'.
            '<div class="timeline-item-content">'.
              '<div class="timeline-item-title">'.$title.'</div>'.
              '<div class="timeline-item-snippet">'.$content.'</div>'.
            '</div>'.
          '</li>';
  return apply_filters('timeline_item_tag', $tag);
}
endif;
JINの子テーマのstyle.cssに追加
/*********************************
* タイムライン
*********************************/
.timeline-box {
  margin-bottom: 20px;
  border: 1px solid #ccc;
  border-radius: 4px;
  padding: 16px 5px;
  box-sizing: border-box;
}

.timeline-box *{
  box-sizing: border-box;
}

.timeline-box .timeline {
  list-style: none;
  padding: 0;
  margin: 0;
}

.timeline-title {
  font-weight: bold;
  font-size: 1.1em;
  text-align: center;
}

.timeline > li {
  margin-bottom: 60px;
}

.timeline > li.timeline-item {
  overflow: hidden;
  margin: 0;
  position: relative;
}

.timeline-item-label {
  width: 110px;
  float: left;
  padding-top: 18px;
  text-align: right;
  padding-right: 1em;
  font-size: 14px;
}

.timeline-item-title {
  font-weight: bold;
}

.timeline-item-content {
  width: calc(100% - 110px);
  float: left;
  padding: .8em 1.4em;
  border-left: 3px #e5e5d1 solid;
}

.timeline-item:before {
  content: '';
  width: 12px;
  height: 12px;
  background: #6fc173;
  position: absolute;
  left: 130px;
  top: 24px;
  border-radius: 100%;
}

/* for Smartphone */
@media screen and (max-width: 480px) {
  .timeline-box .timeline {
    padding-left: 10px;
  }

  .timeline > li.timeline-item {
    overflow: visible;
    border-left: 3px #e5e5d1 solid;
  }

  .timeline-item-label {
    width: auto;
    float: none;
    text-align: left;
    padding-left: 16px;
  }

  .timeline-item-content {
    width: auto;
    padding: 8px;
    float: none;
    border: none;
  }

  .timeline-item::before {
    left: -12px;
    top: 19px;
    width: 21px;
    height: 21px;
  }
}
記事編集ページでショートコードを記入
※ショートコードが反映されてしまうので[の後に半角スペースを入れています。
半角スペースを除去してご使用ください。
[ timeline title="メインタイトル"]
   [ ti label="ラベル名1" title="タイトル1"]コメント1[ /ti]
   [ ti label="ラベル名2" title="タイトル2"]コメント2[ /ti]
   [ ti label="ラベル名3" title="タイトル3"]コメント3[ /ti]
   [ ti label="ラベル名4" title="タイトル4"]コメント4[ /ti]
   [ ti label="ラベル名5" title="タイトル5"]コメント5[ /ti]
[ /timeline]
入力すると下のような感じになります。
- ラベル名1タイトル1コメント1
- ラベル名2タイトル2コメント2
- ラベル名3タイトル3コメント3
- ラベル名4タイトル4コメント4
- ラベル名5タイトル5コメント5
最後に
うまく導入できましたでしょうか?
もしうまくいかないよ〜って方いたらご連絡くださいませ!
ブログ作成や悩み解決の依頼や見積もり相談は
または
までご連絡ください。
ブログ記事執筆依頼等もご連絡ください。

コメントお待ちしてます!
[…] 貼り付け用コードはこちら […]
[…] 参考 JINでのtimeline用ショートコードの実装方法 […]